Showing posts with label cables. Show all posts

Wednesday, November 05, 2008

Finally an FO

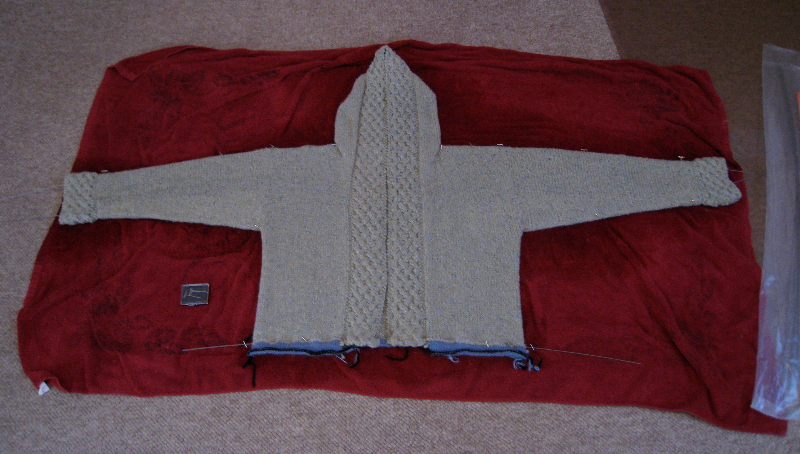
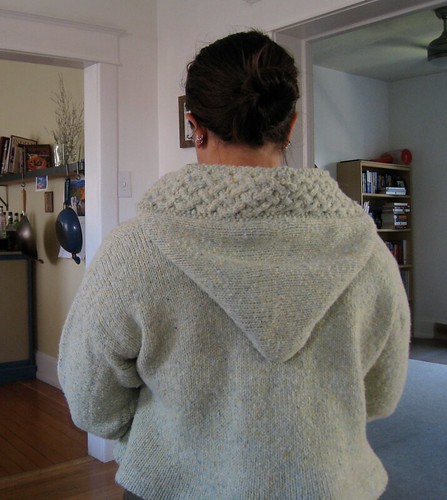
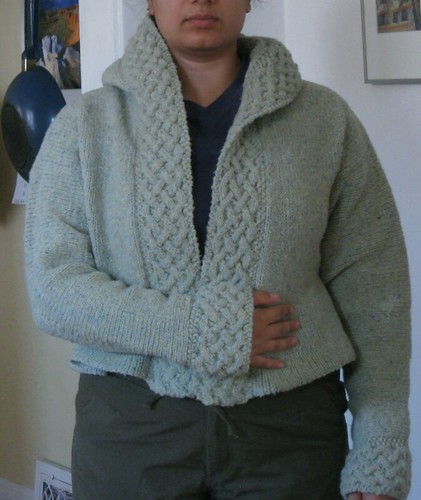
I'm behind in blogging by a couple of months. In August, I finally finished sewing up the hem facings on Arwen (Ravelry project link). A good steam blocking smoothed out the bottom of the sweater nicely. It also caused the bottom to stretch out a bit, but I'm sure with a few wearings everything will even out nicely.

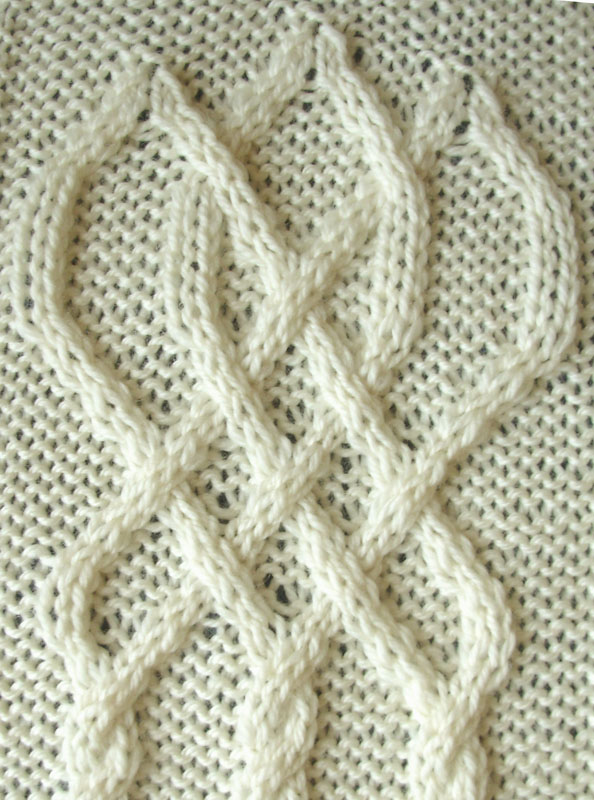
The finished product is big and warm, which is very welcome now that there's snow. The cables look really good knit up in McTaggart Tweed and the stockinette portions fluffed up and bloomed nicely with blocking.


The colour isn't something I'd normally choose for myself, however I also feel like I've fallen into a colour rut. The light blue-green is good because it's unsaturated enough to be a neutral colour when warn with most of the dark cool colours I normally wear. I'm also starting to like the look of tweedy yarns. Either way, Arwen will bring some much-needed diversity to my wardrobe.

Sunday, August 10, 2008

Dragging my feet


It really does take me forever to finish an adult-sized sweater. I started Arwen in September 2007. Machine knitting the stockinette parts on the LK-150 (tension dial set to 6.5) went quickly enough. Unfortunately, the sleeves turned out too narrow to be comfortable with a long-sleeved shirt under the sweater. Since I had planned the sweater as an outdoor jacket, this wasn't going to be acceptable.

Over the winter, I fixed the sleeves in fits (unpicked cast-on and bind-off edges) and starts (added additional short rows to widen the sleeves). I've been pushing to finish this in time for fall; I even took the final cable panel on our backpack in the Uintas last weekend. Knitting by a pristine alpine lake is an experience.


I think it finally turned out well: I really like McTaggart Tweed for rugged, warm sweaters. I'll post modeling photos once it's dry and I stitch up the hems.

Sunday, March 02, 2008

One month, two conferences, and two countries later...

I did a LOT of running around, and had nearly no time for knitting except on ridiculously long
train rides, but I managed to make decent progress on my cape. Here's the full-body-so-far shot:
I am using the vague-ish instructions from Barbara Walker's Knitting from the top.
The idea is that a cape/cloak is just a raglan that does not separate at the underarm for sleeves.
Simple enough, I wrote out instructions for a top-down raglan cloak that includes some cable panels from Elsebeth Lavold's Viking Patterns for Knitting on the front edges, (s-hitches from Arde, p. 73), raglan non-sleeve (wide panel with little lattice, p. 51), and the back (Vigdis pattern, p.81 over 24 stitches). Here's some detail shots of the cables in the order listed above.


I am finding that the Lamb's Pride Worsted has great stitch definition even though I am knitting at a ridiculously loose gauge in order to felt this sucker, so I feel confident that the
cables will survive the felting process. I never realized what a good-value cable-knitting yarn this was, and I'll probably use it again for sweaters. I just wish the mohair was less scratchy, but I can put up with a bit of scratch.

One good (or bad) thing about conferences is that the organizers tend to put random people of the same gender together in my hotel room. Imagine my surprise when I arrived in my hotel room in a tiny university town in the Netherlands to a pile of stuff on one bed including a pair of 3.5 mm straight needles with some fingering weight pink merino knitted into perfect teeny tiny stitches. A knitter! Of all the random conference attendees I was paired with, they put me up with another knitter. Needless to say, some yarn browsing took place in the 2 hours between the end of the conferences and catching our trains back. I finally saw some Hanne Falkenberg kits up close, and they are gorgeous! Too bad I can't justify spending 100 euros (about 150 dollars) on a kit. My favourites in the shop were Gloria shown in the colors I linked to, and Jazz. The pictures do not do the kits justice. But still, they are prohibitively expensive, so my new shopping buddy said I should take the mental picture for inspiration, and knit my own version with what I've got available.

I also had the good fortune of sharing a room with a knitter in Berlin, and we went to a yarn shop on Oranienstrasse (in the very cool Kreuzberg district) and I picked up a few balls of some no-name single ply lambswool in order to make my take on Gloria. On the overly long train ride from Berlin to Hannover (my roomie's transfer point) she taught me how to purl continental style. I was on a purl row. It took me 2 hours (!) to do one row. I guess I'll have to practice, and track her down for lessons on how to knit continental style. She watched me knit 'British-style' and shook her head and said "I just don't see how you can do that." Different strokes for different folks, I guess.

Here's a picture of my circular jacket yarns all nestled together:

I think it'll work (I hope!) and I'll cast on after I try a kiddie-version for the soon to be expected
cousin's kid. They are two different colors of no-name-provided German lambswool in an aran weight from somewhere near Hamburg (according to the shop employee) in a greyish lavender and petrol blue solid, paired with some Fleece Artist Kid Aran in the Marine colorway.
I'll be basing the construction on one of the 8-million free pinwheel jackets from the Elann website by Shelley Mackie but I may throw in a texture pattern like on Gloria. And I will make the sleeves striped. I particularly like this version of the pinwheel jacket, so I'll just let the ideas mingle until I have the time to cast on. I'll test texture patterns in my collection of purpley Soft Shetland balls and medium gray merino for the kiddie version.

Ivanova

Sunday, February 03, 2008

I "felt" like experimenting...

This week I decided to finally try felting. I am starting to plan my next vacation getaway to a medieval festival in May, and my husband commented that we would most likely by camping out. Probably in period gear. And if we don't camp out and get a hotel room, May is still kind of cold and damp! So I decided I needed a wool cloak. I started looking at general cloak designs, and there are some really nice LOTR inspired patterns available here. Hunt around the links, this site is a nice time suck if you're into that sort of thing. Unfortunately the wool fabrics available at the local department store fabric section kind of suck. And forget going to a fabric shop, there isn't one! (At least not a good one). And, sure, there's always Ebay, but I'd rather have something a little more inspired (and complicated) than a plain piece of gray wool draped from the shoulders with some sort of hood sewn in.

So I figured I'd felt my own after knitting it! Of course it will be cabled, so I wanted to see a) how a felted fabric looks in terms of stitch definition (and loss thereof) and b) how texture holds up to the felting process. I know it can be done nicely because I saw a felted cabled handbag pattern in the winter 2007 issue of Interweave Knits. Here's one example - very nice!

So I started with some DK merino (Frankengarn naturstrickwolle) and tried out the Dragon Scale pattern from Barbara Walker #2. I hand felted with hot soapy water and it turned into this:
Little to no stitch definition! And it's a nice stiff but light fabric, not too bad for a cloak.
I knitted it up on my Denise 11's (they're bigger than the standard US 11). I also hand-felted for about 20 minutes. For the inquiring minds, this yarn is a 2-ply. I heard somewhere that plied yarns felt cables better, but the down-side to using this stuff for the cloak is that I'd have to buy more yarn! You should have seen my husband's face when he heard this. He cringed! I guess the wool is sort of taking over our apartment. So I dug through my Christmas stash and unearthed the cones of Lamb's Pride Worsted in a dark green color. I certainly have enough of it!

I read on Knitter's Review that the ideal gauge for felting LPW is 3 sts/in. I get 3.8 sts/in on Denise 10 1/2's (smaller than standard) and 3 sts/in on Denise 11's (bigger than standard). So I knitted up a simple cabled close-loop and braid pattern (made up from my head) and hand felted both swatches. Here's the before and after pics.
This is the one done on Denise 10 1/2 needles. I only got about 15 % shrinkage in length after hand-felting and I felt it had not lost enough stitch definition. So I boiled it and agitated it in boiling water. Not a lick of difference was noticeable in size or loss of stitch definition. It fuzzed up a fair bit though. It's nice and thick, with a little bit of sproing left from the knitted fabric and the cables still show. Some dye was shed in the boiling process, but the vast color difference in the pics is due to the different lighting conditions. The top photo has the most accurate color, and the color shedding isn't noticeable in the boiled swatch.
This one was done on Denise 11's. The fabric was VERY loose before felting. I found it hard to keep the tension even when knitting the cables, so I got a hole (circled on the center picture) that didn't felt. I guess the Murphy's Law of felting is really true after all. I got 14 % length shrinkage with vigorous hand-felting, and it still retains stitch definition. I figure my best bet is to use the 10 1/2 needles because I get a nicer looking fabric in the end of it all.

So now for the pattern choices - I could not find any for a knitted felted cloak! There are a few knitted cloak patterns, and examples can be found by googling and surfing Ravelry. This one is nice, but it's from a Finnish book. The book is kindof expensive too. This one's okay, but not really what I had in mind. Now this one has the right shaping and would look reasonably historically accurate. I figured out by reading the blog of the flickr account I directed you towards that it is a raglan-shaped cloak, knit from the bottom up. So I popped out my Barbara Walker's Knitting from the Top and lo and behold there were vague-ish instructions for how to turn a top-down cardi into a cloak/cape. I've already picked out my Viking Cables (from Lavold's book) and I cast on already. I'll probably go to mid-calf, which should bring it to about knee length after blocking. I also need to figure out how to knit a hood...

Ivanova

Saturday, January 26, 2008

Celtic Knot #7

Intertwined Heart and Happiness Sign

This knot was inspired by an image from the Book of Kells found on page 28 verso (the back side of the page), where it is part of a border in a portrait of St. Matthew. Here's my hand-drawn attempt at reproducing this knot.


I know I suck at drawing, but you get the idea. My reference book is The Book of Kells Selected Plates in Full Color edited by Blanche Cirker. So.... here's what I came up with. I used Wolle Roedel Soft Merino knitted on US 8 needles (5 mm) for this swatch.


I wanted a cable that could be a continuous cable or a stand-alone knot. Like I tend to do, I charted this with some set-up rows (rows O1-O8), a chart repeat (rows 1-36), and some finishing rows (F1-F6). If you want to knit what I have photographed above, knit rows O1-O8 from the chart, then knit rows 4-36, rows 1-36, then rows 1-24, finishing with rows F1-F6.
For this combination of a picked-up knot cable, you need to begin with 24 cast-on stitches. If you want to knot a long continuous cable without the stand-alone start, you need to begin with 36 cast-on stitches. If that is your preference, I'd recommend knitting 3 4-stitch, 4-row rwisted rope braids as charted in rows 31-34 3 times. This might take a bit of swatching. Play with it and have some fun. If you want only the stand-alone knot, knit rows O1-O8, rows 4-24, then finish with rows F1-F6. Here's the chart...


Now I omitted the dots from the stand-alone parts of the knot. I originally swatched with some bobbles but I didn't like them - I suck at knitting bobbles. If anyone want to reproduce the original knot exactly, play with bobbles and email me a link to the pictures!

Here's some gratuitous detail shots...


Happy knitting!
P.S. Don't forget to get the legend.


Sunday, January 06, 2008

Another year gone by...

And now that I think about it, I have knit a lot of sweaters this year! Guess that makes me a 'sweater knitter' now, and not so much of a lace knitter. In my last post I promised some better pics of the fully finished Garnstudio Drops Sing Jacket, so here is one (though done in crappy light).
I've been wearing it constantly since it's been finished and I like it a lot! The Yorkshire Tweed Chunky blocked into a nice soft drapey fabric, though it was a royal pain in the butt to wash in a bucket. It was huge and wet and dripping all over the bathroom floor, and one sleeve would hang over my sweater-filled arms and stretch out like crazy! Luckily some pulling and patting got it to be more-or-less the same length as the other sleeve. Guess which one from the photo!

Anyways, the sweater was a huge hit at the 8 million or so holiday parties I attended. One lady asked my if it was very expensive because it looked very expensive (i.e. it cost a fortune or I made it myself). Yay! I think this would make it the best sweater yet. Now, being a perfectionist, I would always change those little details that I think are less than perfect. I would definitely add more buttons, and make them a touch closer together. I also deviated from the instructions on the collar, and having picked up more stitches along the neckline, I should have skipped increasing the number of stitches on the second row because the collar is too wide for my neck. I fold it over in half (inwards) and I find it annoys me less, but it doesn't really look like the original collar either. Oh well, not worth ripping over.

This sweater also nearly convinced my mother to take up knitting. If I were to do it again, I'd use Istex Lopi because it comes in such beautiful colors if I (or the recipient) could handle the scratch factor. I pawed lots of Lopi at North American LYSs over the break!

Now for a FO report for a baby sweater I gave to a friend, and has been successfully received so I can blog about it now.

Pattern: Ripples in Time by Fiona Ellis from Inspired Cable Knits
Yarn: Rowan 4 Ply Cotton, colorway Fennel

Mods: I made it into a cardigan by omitting the center wide cable panel and adding a 7 stitch wide seed stitch button/buttonhole band on each side. I also was not aware of the errata published for the pattern (even though I googled it several times and came up with nothing) so I knitted the wide cable panel WRONG (boo hiss!). If you are going to do this number, GO HERE FOR THE ERRATA. Scroll down to the bottom of the page and look for the 'download errata' link. And thanks to Ravelry editors of this pattern page for providing a link to the errata. Yay! All in all, I don't think that the error is so noticeable. I also remember being quite confused about the cable panel placement in the written instructions and had to figure it out from the not-full-body photo. The neckline instructions were also confusing, so I looked at photographs and Thrace went to a baby clothing store in order to figure out the assembly. Thanks Thrace, you rock!

Comments on the yarn: this is a nice soft cotton to knit with. I don't usually use cotton because I am always freezing and prefer wool garments for myself. But some people are cautious about giving wools to babies and this yarn is a very good option for fine gauge baby knits. It also comes in fantastic colors that are not babyish, and there are lots of gender-neutral options. Now can you tell there's a 'but' coming? There were about 4 knots in EACH BALL. Boo! Hiss!
I've said it before, I'll say it again. Rowan yarn is expensive, especially if you don't live in the UK. If I pay more I expect to get more, and I'm not getting more. I would only buy this yarn again if someone on eBay were to have a serious 50% off sale.

If I were to knit this sweater again... I would use a wool yarn. I had to knit at such a tight gauge (and I got row gauge but not stitch gauge, so I followed the instructions for the largest size to end up with finished dimensions for the second largest size) and the cables were so difficult to knit that I cannot recommend using cotton for this one. Maybe a cotton-cashmere, cotton-acrylic or cotton-merino blend would be better. But either way the recipient is happy, so I'm happy. No word yet on the baby liking it because he won't fit it for at least another 6 months or more. Here's a back shot so you folks won't have a heck of a time figuring out the assembly details.

On the needles...Trud by Elsebeth Lavold from the Viking Knits Collection Volume 1.
It's unblocked and the peplum is unseamed. I sure hope it fits! It's quite a relaxing knit with all of that (reverse) stockinette, but that peplum sure eats yarn. I'm currently working on the sleeve, so I can be sure I'll have enough to finish. And the yarn is as soft as buttah... yummy ;).
The cables pop out nicely, so I'm quite pleased with this Frankengarn undyed merino. It also comes at a nice price, and I'm considering their undyed dark brown for future DK weight knits.

Now for some eye candy, captured along the way while I went pretty much everywhere this holiday season.
This was taken from the tallest peak in the Black Forest - Feldberg. It was very very pretty and I have tons more photos of mountains and trees which I may upload to my Flickr account.
I also dashed into a North American greenhouse to escape the chill and saw some GORGEOUS flowers in some very nice arrangements. I want a yarn in this color...
The black and pink combo is spectacular. It would look very good in a variegated yarn, I think!
Funny how it always comes down to yarn! I also like these pinks and purples...
Happy New Year!

Ivanova

Saturday, October 27, 2007

Celtic Knot #6

Linked Rings With a Twist

Well folks, there is finally a new knot! These days I've been looking for inspiration, and increasing my Celtic Knot source library has helped. There are a lot of very beautiful knots out there, but they won't all look good on sweaters. I've also been hunting for good photos of Celtic Knot stone and metalwork for inspiration and came across a few good ones. I think I need a copy of the Book of Kells too, that would help! Anyone know where I can get one? Is there one?
Anyways, here's the knot... I coupled a linked-rings motif (probably identical to Lavold's from Viking patterns for Knitting) with a twisted-loop cable on the right.


This sample was knit from Wolle Rodel Soft Merino on US 8 (5 mm) needles. This was also done using Grumperina's method/tutorial of knitting cables without a cable needle. This takes a bit of practice to feel as natural as using a cable needle, but it's worth the effort. I'm tired of picking cable needles out of the couch cushions, the bottom of my purse, etc...!
This panel starts with 20 stitches, increases to 32 stitches (over the first 4 rows), then decreases back to 20 stitches in the last 2 rows. It's set up to be a 'true knot' with no beginning and no end, so I began with a hearts motif with a twisted loop to the side (rows O1-O16) which grows into the linked ring motif connected to the loops (rows 1-28) and finishes with a hearts motif with the twisted loop on the side (rows F1-F16). The center of the panel (main motif, rows 1-28) are meant to be repeated as many times as is desired, then finished off with the top of the knot. But the main motif would be nice on it's own too, it's just not a knot anymore, it's a braid.

Other modifications could include flipping this around and having the twisted loops on the left of the linked rings, or having twisted loops on both sides and eliminating the hearts (or pretzals [sic] ;) ). Excercise for the reader! This knot uses the legend from this project, so be sure to get it if you haven't already. I think that this would make a nice wide border panel, running along the long sides of an afghan or a cardigan. Here's the chart...


Ivanova

Sunday, May 13, 2007

Celtic Knot Project Installment #5

Hearts on a Mat Connected by Braids

This one was modified from an illustration in Sheila Sturrock's Celtic Knotwork Handbook, panel 86 on page 87. I could have charted it as illustrated, but I wanted a continuous cable, not a stand-alone knot, so I extended the start and finish of the lowed and upper loops into twisted
cables. It would not be difficult to modify into a stand-alone panel.... heh heh, I'm leaving this as an excercise to the reader! Hint: it's super easy to visualize if you have Sturrock's book in front of you. Anyways, here are the photos.


These photos are of the same swatch, but there was sucky natural light due to the week-long overcast skies, so the top one was taken in the window with some non-natural light from the ceiling lamp, and the lower photo was taken with a flash. Either way, you get the idea. This sample was knit from, yeah you guessed it if you're a regular reader, Wolle Rodel Soft Merino.
This panel starts with 32 stitches, increases to 40 stitches, then decreases back to 32 in the last 2 rows. It is 30 rows long. Here's the chart:
A few notes on this one:
1. I used a couple of new symbols here than in previous installments - I needed to cross 2 knit stitches over 3 purl stitches in a few places to make space in between the backs of the hearts. These symbols are not in the legend, and I don't want to update it every time I use a new symbol, so instead I included them at the bottom of the chart. You do not need to re-download the legend if you already have it, but you do need it to interpret this chart if you don't already have it.
2. Knitting is always the best test of an abstract idea, like taking an illustration and turning it into something three-dimensional. Having charted and knitted it, I see something I would have done differently, and will change if I use this panel in a design. (Aside: you know I will!) If you don't want to wait, I will type it out here in words, and you will have to alter the chart yourself, unless you like it as presented. I would move the two left cable crossings from row 1 to row three. I would then eliminate rows 29 and 30 from the chart alltogether, making this a 28-row repeat panel.
3. I think this would look very nice if there were several twists in the braid before making the knot, and I think this is how I would use it, with at least 1 extra left twist in the braids connecting the knots, maybe more.

Cheers,

Ivanova

Sunday, April 29, 2007

Celtic Knot Project Installment #4

Hearts and Loops

I knitted up three separate panels containing hears and left and right facing loop knots in this swatch. The central panel was illustrated in Sheila Sturrock's Celtic Knotwork Handbook, and I made panels of only left facing and right facing loop knots to go with it. They would be nice for symmetry purposes, on the right and left sides of a garment, for example. The central panel would be nice as a stand-alone panel, or put all three together - it's up to you! The chart is below: The chart is below:


Notes on the charts:

-To knit the hearts with right facing loop knots (on the left of the swatch), start with the set-up rows a.k.a. the upoward facing hearts, rows O1-O18, knit rows 1-22 twice, and then knit the finish rows a.k.a. the downward facing hearts, rows F1-F16.
-To knit the hearts with left facing loop knots (on the right of the swatch), follow the instructions above, but use the other chart.
-To knit the hearts with alternate left and right facing loop knots, start with the set-up rows for the hearts (they are the same for both charts), knit rows 1-22 once of the left facing chart, then knit rows 1-22 once of the right facing chart, then finish with the finishing rows, they are identical in both charts.
Also note that you can knit rows 1-22 as many times as you like, and the set-up and finishing heats can be omitted if you prefer.

Ivanova

Wednesday, April 18, 2007

Spring knitting

The local stitch and bitch held another knit exchange yesterday evening. The theme was spring colours and cables, and as usual there were some neat projects. I got a pretty felted clutch, which I'll photograph later.

For my contribution, it was a bit of a challenge to find non-garment, gender-neutral item to make.


The pattern is my own, which is basically a 13in x 13in square for the front and two rectangles for the back: one was 13in x 8in and the other 13in x 6in, each finished with a 2 stitch i-cord bind off. The back pieces overlap to make an opening for a 12in x 12in pillow form.

I used 100g of Araucania Nature Wool from Piper's Quilts knit on US 6 (4.2mm) needles. The stitches used are Moss stitch, Wheat Ear Rib from Barbara Walker's treasuries and Celtic Vine from Encyclopedia of Knitting. While knitting, I noticed that Wheat Ear rib has an interesting reverse side.

A few notes about Nature Wool: the manufacturer's suggested gauge of 4.5 stitches per inch is too loose for this yarn in most applications, washing caused a lot of colour bleeding and it pills considerably with friction. On the other hand, the variegated colours are beautiful and managed not to pool, and the final fabric is fairly soft.

Sunday, April 15, 2007

Celtic Knot Project Installment #3

Right and Left Facing Hearts on a Wide Rib Panel

Here's the swatch.


I quite like this one, I think it would make nice panels on the sides of a sweater knitted in a fingering weight yarn so they're not so wide, or together as a center panel. On the left is the right facing heart panel, and on the right is the left facing heart panel. The right facing heart was charted from Sheila Sturrock's Celtic Knotwork Handbook, from a panel on page 28, chapter 3 panel number 2. To satisfy my deep-seated need for symmetry, I charted an opposite-facing panel as well. This sample was knitted in Wolle Roedel Soft Merino, and the charts are presented separately. Immediately below is the chart for the right facing heart panel,
and here is the chart for the left facing heart panel.


Refer to the legend link at the upper left (under the Celtic Knot Project sidebar item) to figure out what these symbols mean. Now for a few words on the charts:
1. These panels start as 18 stitches wide, grow to be 26 stitches wide with the increases on set up rows o1 and o3 and repeat rows 1 and 3, then narrow to 18 stitches with the decreases on repeat rows 19 and 20, and finishing rows F23 and F24.
2. Rows o1-04 are set up rows. Knit them once, continue through the pattern repeat rows 1-24 as many times as you like, but on the last repeat finish with rows F23 and F24 instead of 23 and 24.
3. The swatch above was made by placing the charts for the right and left facing heart panels side by side. I knit rows o1-o4 once, rows 1-24 once, rows 1-22 once, and rows F23 and F24 once.

Have fun swatching!

Ivanova

Sunday, April 08, 2007

The Celtic Knot Project installment #2

Two Hearts Facing Inwards
This panel was charted from Sheila Sturrock's Celtic Knotwork Handbook, from an illustrated variation of panel 4 from chapter 3, page 29. I have seen hearts connected on twisted cables before, like in the sleeve and side panels of Cromarty (see a lovely example here) from the Celtic Collection by Alice Starmore, but this one is unusual because the hearts face the other way and the cables swing out a bit before coming in again. And I think the increase technique I used is nicer because the heart-shaped knots are more angular, and dosen't pucker the fabric. Here's the swatch.


I only knitted one repeat, but you get the picture. The swatch was knitted from Wolle Roedel Soft Merino, an aran weight superwash merino yarn that is very soft and springy. Sorry, I think it's only available in Germany. Now here's the chart:

A few words are in order before you start knitting it up.
-Rows O1-O4 are set-up rows. Only knit them once, continue the chart as far as you desire, and when you are ready to finish the panel, instead of knitting rows 35 and 36, finish with rows F35 and F36.

-I had to put cable crossings across the no-stitch symbol on rows 3 and 31. I know it's a bit ugly, but it works the same as if those black squares were not on the chart at all. When you get to the black squares just keep on going. To be absolutely explicit, as an example, say you are starting row 3. Purl 8 stitches, slip 2 purl stitches to your cable needle and hold to the back, knit 2, purl 2 from the cable needle. Purl 4, slip 2 knit stitches to your cable needle and hold in front. Purl 2, then knit 2 from the cable needle. Purl 6. There, you're done row 3! Wasn't that easy?

-If you look closely at the swatch, you'll notice that the stitches immediately after the 4 stitch increases at the bottom (rows O1-O4) are crossed, and the stitches immediately before the decreases at the top (rows F35 and F36) are crossed. This is how the panel was illustrated in the book, and how I originally charted and knitted it, but I didn't really like it that way. Instead I charted it as a cable cross between repeats only. If you are willing to trust me on this, follow the chart as written. If not, knit rows 35 and 36 before row 1, and before rows F35 and F36, and you will end up with what I swatched.
Saturday, March 17, 2007

Eva is done!

Well, here she is!
I am quite pleased with the results, even though I'd make a couple of small changes if I were to make her again.
Pattern: Eva, my own design
Cable panels from Viking Patterns for Knitting by Elsebeth Lavold, instructions adapted from the Knitter's Handy Book of Sweater Patterns by Ann Budd, for a set-in sleeve sweater.
Yarn: Cuffs, hem, button bands and collar: Noro Silk Garden color 201. The rest: Kilcarra of Donegal Irish Tweed, in a blue color (two blues spun together) with cranberry flecks.
What would I do differently, seeing as this was my own experiment? I would have made the sleeves a touch longer. Like 1/2 an inch, or 3 or 4 rows. I'm sure I can block them a bit longer in the next washing though. I think it still looks acceptable though. I would have also made the shawl collar a touch wider. It creeps up a bit, and I keep on pulling it down in place. I guess I'll have to tack it down with the leftovers of the Silk Garden. But this is a flattering fitting sweater, and had none of the sleeve cap issues that Ingrid had. I guess we do learn from our mistakes! Here's the modelled shot.
Not a great shot, but you get the picture. I'll arrange for a better one when I'm feeling less sick, and when my husband isin't out running my errands. Now in a fit of indicisiveness over which project to plow through and finish, and which one to start next, I made a hat out of some of the leftovers from Eva.
This is the Ragna Cap from Elsebeth Lavold's Viking Patterns for Knitting.
Modifications: My row gauge was way off, and there was no way 5 cable panel repeats would fit around my head, so I knit 8 repeats before casting off and grafting the panel ends together. Then I knit the hat in the round, where the instructions say to knit it flat and seam it up. But I kept the same number of stitches and rows for the crown (minus the 2 selvedge stitches) so maybe I should have looked up the errata for this one. Either way, it fits my head pretty well!
Now I have a sort of matching sweater and hat set!

Ivanova

Monday, February 26, 2007

Coronet and more

I'm too tired right now to make up a witty (or witless) title. I finished C's hat last week. It's been washed, dried and shaved: this wool fuzzes somewhat with handling and pills after washing, but looks great (at least for now) once the loose bits get removed.

And here's the top.

Pattern
Coronet by Alexandra Virgiel from Knitty winter 2003.

Materials
Two skeins (approximately 77 grams) of Mission Falls 1824 wool in denim on US 7 (4.5 mm) needles at a gauge of about 5 stitches per inch after washing and drying.

Mods
I made the band using a horseshoe cable (same number of rows as the original) and worked a slipped stitch selvedge at each edge of the cable band. The hat was also knit up as a beanie, so I picked up stitches (84 stitches) for the hat body with the right side of the cable band facing out. I used C's most worn knit hat as a guide for diameter (10 inches, 25.4 cm) and depth (8.75 inches, 22.22 cm unstretched).


As you can see from the photo, C is on crutches. There was a snowboarding injury on Saturday involving his board edge and a rocky slope resulting in a fractured kneecap. It's funny, but I figured that I would get the first serious snowboarding injury around here. We spent a total of 10 hours (I'm not exaggerating in the slightest) getting him medical care; enough time for me to finish one mitten minus the thumb and start it's mate (I always have knitting when we go play outside, in case I need a break). I'll post photos later.

In other knitting news, I took the Kilim-style hot pad knitting class at Black Sheep weekend before last, and why not? I've done very little colour work and figured I could benefit from some advanced expertise. The tips I picked up will apply to stranded colour knitting as well.


The hot pad (main colour is Harrisville New England Highland, contrasting colour and backing is Cascade 220) we started as a sampler for a kilim-style mosaic knitted rug turned out fine, although it puckers a little at the sides. I'll have to carry the yarn more loosely next time. Since I did end up buying the rug pattern, I guess I'll have to practice.

Sunday, February 18, 2007

Decisions decisions

I'm blocking the sweater fronts now, so button bands will be added soon, probably within the next week or two. Which brings me to a decision I've been putting off for a while - which buttons will I use? I have two choices seen above on the blocking sweater - the upper one is from a set of bone buttons purchased over Christmas break with no intended purpose, I just thought that they were cool. I really like the way it has swirly patterns on it - like the cables. I adore button-band ornamentation, as can be found on 17th-18th century menswear like in this pic, taken from a collection from the Victoria and Albert Museum.

Styles like this can also be seen on Centauri men's jackets on Babylon 5, and to a lesser extent on King Theoden's gear in the Lord of the Rings, The Two Towers. He aso had gold braided rope-like things around the armbands of a velvet cloakey-jackety thing, which I have also included in my sweater. I wonder why the Elves had no knitwear (even though some designers have been inspired to create some), in fact there was surprisingly little knitwear visible on the Humans, and Hobbits (even though other designers have also been inspired...). In fact, the only possibly knitted garment I saw displaying celtic textures (the happiness sign) was on Gandalf, when he had become the white wizard. He was wearing a white hooded cloak, and there were some textured cables around the hood. But the garment didn't look knitted, so I'll bet it was felted, but retained the texture panels. And why hasn't anyone started a LOTR knit-along yet?

Anyways, back to my decision. The upper one is the bone button, and the lower metal one is from a set of Tudor Rose pewter buttons, actually purchased for this sweater. Which one do I pick? I'm torn! Please delurk, and leave me an opinion!

Now here I am, not even finished the current sweater and I'm planning the next one!
Here's a scan of my sketch:
OK, I know I can't draw, but I try anyways. It will be a raglan shaped cardigan, with a deep v-neck, and deep waist ribbing, made from some DK weight tweed I have in the stash. This design was inspired by Elsebeth Lavold's Fjalar, shown below from an old post.
I had highlighted my issues with this sweater. My solution: eliminate the puckered neck by making it a cardigan with hook and eye closures. And the baggy sleeves by making it a raglan sweater. I also switched cable panels because I will be continuing the cables all the way around, and I won't have to graft at the back of the neck if the panels have up-down and left-right symmetry, so the button bands and collar can be knitted in one piece. I chose a linked-ring motif from the same book, Viking Patterns for Knitting. Now to work out the details... I'm so excited I can't wait to cast on!

Ivanova